
Here's the result... not 100% what my mind was envisioning but not too far off it!

And now, if you think it's worthy of recreation... here's the how to (bearing in mind once again that I'm still a bit of a newbie to the whole tutorial thing - I am trying to cut down the length of the tutorial to hopefully be a bit more to the point):
Now for a basic guide to a skirt I used the fabulous tutorial 'lazy days skirt' found at Oliver + S. I just adapted it somewhat as I wanted two layers.

Firstly, I cut my fabric for the skirt body (as detailed in the lazy days skirt pattern I used the width of the fabric from selvage to selvage and cut the desired length plus 2"). For my two layers I cut one of the spotty material and one of the floral exactly the same. The other portion of floral fabric I used to make some bias tape. (Another fabulous tutorial on making your own bias tape can be found here at Prudent Baby)

Using my over locker I serged the two skirt pieces together at the top both with right sides facing up.

I then folded, pressed and top stitched the bottom hem of the outer floral layer (two folds so that the raw edge of the material is hidden in the hem).

At this stage the fabric is still one open piece of two layers. I then used a disappearing fabric pen to mark where I wanted the shirring. For this skirt I decided to have two vertical rows of shirring approximately 6" apart running from the outer layers hemline to about 2/3 of the way up towards the waist. It was a little bit of a guesstimate really as to how much or long to do the shirring because I wasn't sure how much it would pull the top layer up.

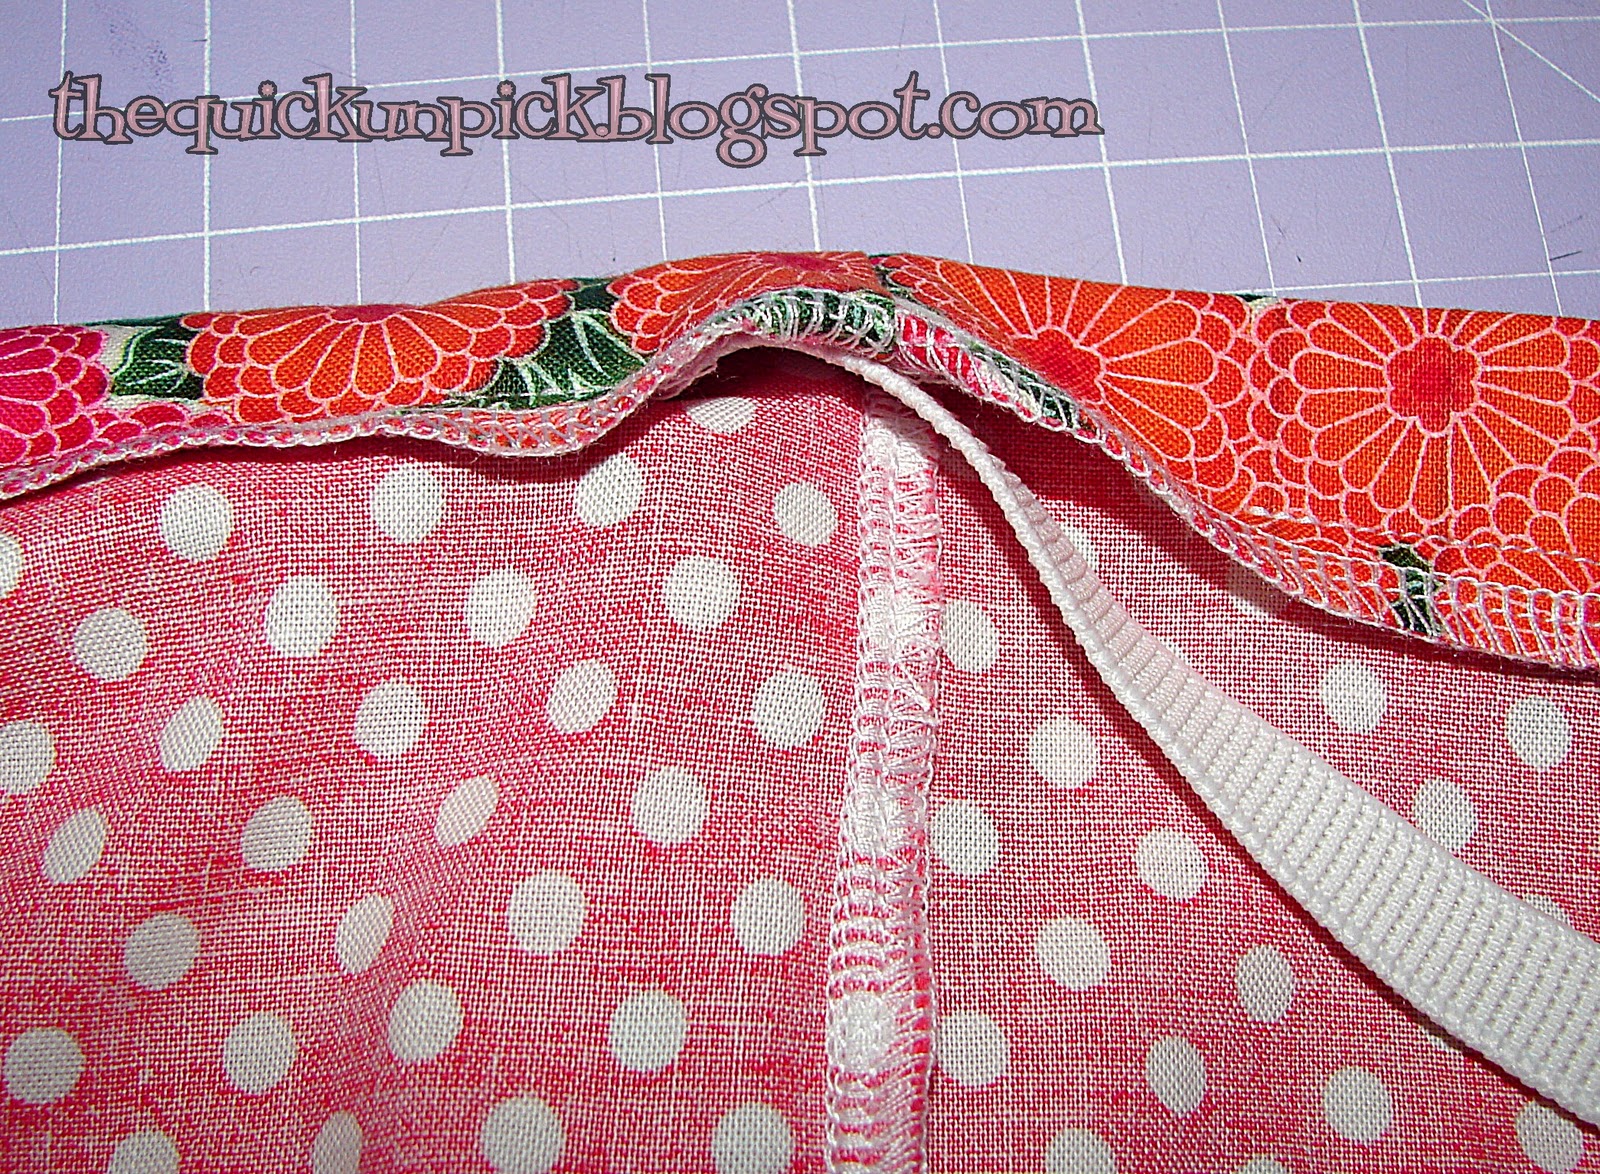
Now I wanted to join the side seam of the top layer only. To do this I flipped the top layer inside out whilst leaving the under layer facing right side up. I serged the floral fabric together being sure not to go onto the under layer.

Then I did the same with the under layer by flipping the top floral layer to be right side up whilst the spotty underskirt was wrong side up and right sides together (does that make sense??) and serged the side seam.

I then hemmed the spotty under layer with the bias tape I made to co-ordinate with the floral fabric.

I then folded over and pressed the top edge of the skirt in order to create the casing tube for the elastic waist band. The width of your elastic will determine the depth of the fold. Sew the casing ensuring you leave an opening big enough to feed the elastic into and through.
Once you have fed the elastic through and stitched it together and closed the opening you are pretty much done. You might find that you need to just give the elastic shirring a couple of bursts of steam with the iron to get it to scrunch up a bit more.
Ta Daa!! Done... yep... you guessed it... time for a victory dance!
As usual, its late as the only time I really get to sew uninterrupted is when my lovely girls are asleep, which means you'll have to come back later to see my Big Little Miss M strutting her stuff in this little number... I might just add a couple of embellishments to the skirt and maybe jazz up a matching t-shirt!
Things I would do different next time:
I think I would make the underskirt just a little shorter as I kind of imagined it just peeking out rather than being quite as exposed as this one. But all in all I am quite happy with the end result and I think it would look better if the waistband was actually done in the under skirt material to give it a little more contrast.
Like it? Let me know... I love getting some feedback and if my instructions are not all that clear let me know about it so I can try to improve them... otherwise Cheers for now & come visit again soon to see what I'm up to!
Oh, and don't forget to check out some of the awesome links on my side bar to some absolutely fabulous link parties :)
This is so cute!! You are a very good seamstress, thanks for sharing :) I'm hosting a new linky party Friday and hope you will stop by! http://www.lovelycraftyhome.com
ReplyDeleteHow cute!! :) Thanks for sharing!
ReplyDeleteI'm your newest follower, feel free to stop by and follow back: http://ashleycreations-a.blogspot.com/2010/12/monday-blog-hops.html
Thanks!
- Ashley
What a fun skirt! Love the fabrics you used.
ReplyDelete~Kimberlee
www.TheSpunkyDiva.com
Like it? I do...i think it is lovely that the underskirt shows so much too because both fabrics are so pretty they both deserve to show off!
ReplyDeletelike it? no, but love it ;D
ReplyDeletei really like the fabric combination. I'll tell you if i made something from your tips and tutorial.
thank you so much janice ^.^
This is fantastic! Am I too old to make one for myself? You are so very talented =D
ReplyDeleteThank you for linking up to the "Amaze Me Monday" blog party. Can't wait to see what you create next.
I love it!! Thanks for linking @Creative Itch's "Sew Cute Tuesday"!
ReplyDeletelove it! I wish I could get away with these skirts like little ones can :) If you have a chance come link up to handmade tuesdays @ ladybug blessings... www.ladybug-blessings.com
ReplyDeleteWow.. this is soo cute. i have got another pattern to try for my daughter. Thank you for sharing.
ReplyDeleteSo pretty! The skirt is so cute!
ReplyDeletewould love for you to link up at our saturday linky party.
ReplyDeletehttp://tosewwithlove.blogspot.com/
That's amazing and cute! I'm impressed by your sewing skills.
ReplyDeleteQuite adorable.
ReplyDeleteThanks so much for linking up yesterday! This is such a pretty little skirt. I hope your little enjoys it! :)
ReplyDeleteI hope you'll link up again next week! :)
LOVE this skirt!!!!!!!! Thanks so much for linking this up to gettin' crafty on hump day!!!!!! :)
ReplyDeleteSo cute! I am ashamed to admit I still don't really know what shirring is (but here in the UK we get craft trends a bit later that you guys)... but that's so cute I will actually do the research so I can make that skirt for my daughter! And I will totally follow your blog- will link to it in my 'useful links' page when I revise it on my blog next week, unless you'd rather I didn't; just let me know and I'll remove it.
ReplyDeleteGreat Tutorial! Love your blog came via Totally Tutorials. Have joined :-)
ReplyDeleteGorgeous skirt! Maybe when my daughter gets out of her stretch pants phase I can talk her into some handmade twirlies! Happy New Year!
ReplyDeleteAnother lovely link to Thrilling Thursday. Thanks for sharing!
ReplyDeleteWhat a fun skirt. This is definitely going on my to do list for the new year.
ReplyDeleteFeel free you link this up to my "Sew Fabulous Friday" link party. It would be a fabulous addition.
agirlinparadise.blogspot.com
This is adorable, and your tutorial is fantastic. I've actually made several Lazy Days skirts for my daughter and I love them. This extra bit of fanciness will definitely make it's way into the next one I make for her. Thank you!
ReplyDeleteAdorable! I'm just getting into sewing and love the stuff you've made so I'm following you!! :) I have a LOT to learn!!
ReplyDeleteSabrina from www.bgamefamily.blogspot.com
I love this skirt!! I will definately be sewing this skirt for my little girl.
ReplyDeleteHave just made one, thx for the tute!!
ReplyDeletehttp://www.flickr.com/photos/29277487@N03/5552622168/in/pool-1355922@N20/
My brother suggested I may like this blog. He used to be totally right.
ReplyDeleteThis post actually made my day. You can not believe simply how much time I had spent for this information! Thank you!
경마
온라인경마
Some athletes find that getting pre competition.
ReplyDeleteAlso visit my website; 온라인카지노
I'm fond of your articles. Thanks for sharing them. Information in the posts give me some pieces of advice. I can solve difficulties by apply them.
ReplyDeleteI think of your posts as soon as I'm in trouble. Your pieces of writing are awesome. 토토
Hello, I read the post well. casino online It's a really interesting topic and it has helped me a lot. In fact, I also run a website with similar content to your posting. Please visit once
ReplyDeleteI'm so happy to finally find a post with what I want. 오공슬롯 You have inspired me a lot. If you are satisfied, please visit my website and leave your feedback.
ReplyDeleteI just loved this skirt. so beautiful and yes as i was reading your tutorial. i felt that the elastic waist band should be of the polka dot material and yes then i read your comment on improvising the next time. wonderful ! i will give this a try. thanks for sharing. :)
ReplyDeleteمكافحة الصراصير
ReplyDeleteمكافحة القوارض