

Just a quick recap, for those that haven’t seen the prior post about my Brown Sugar to Pink Polka Dotty Refashion, here is the skirt I started with…


Now straight into the tutorial…
MATERIALS:

One unloved skirt (that is screaming for a refashion),
Length of Ribbon, for contrast (I used about 1.2 meters or 39”),
43cm or 17” of elastic for headband, optional,
and the usual suspects…
scissors, rotary cutter, sewing machine, overlocker & notions.
THE HOW TO:

Lay skirt out flat with the back facing up and mark out the back of the dress… I made my design from scratch but you could use an existing dress as a pattern guide.
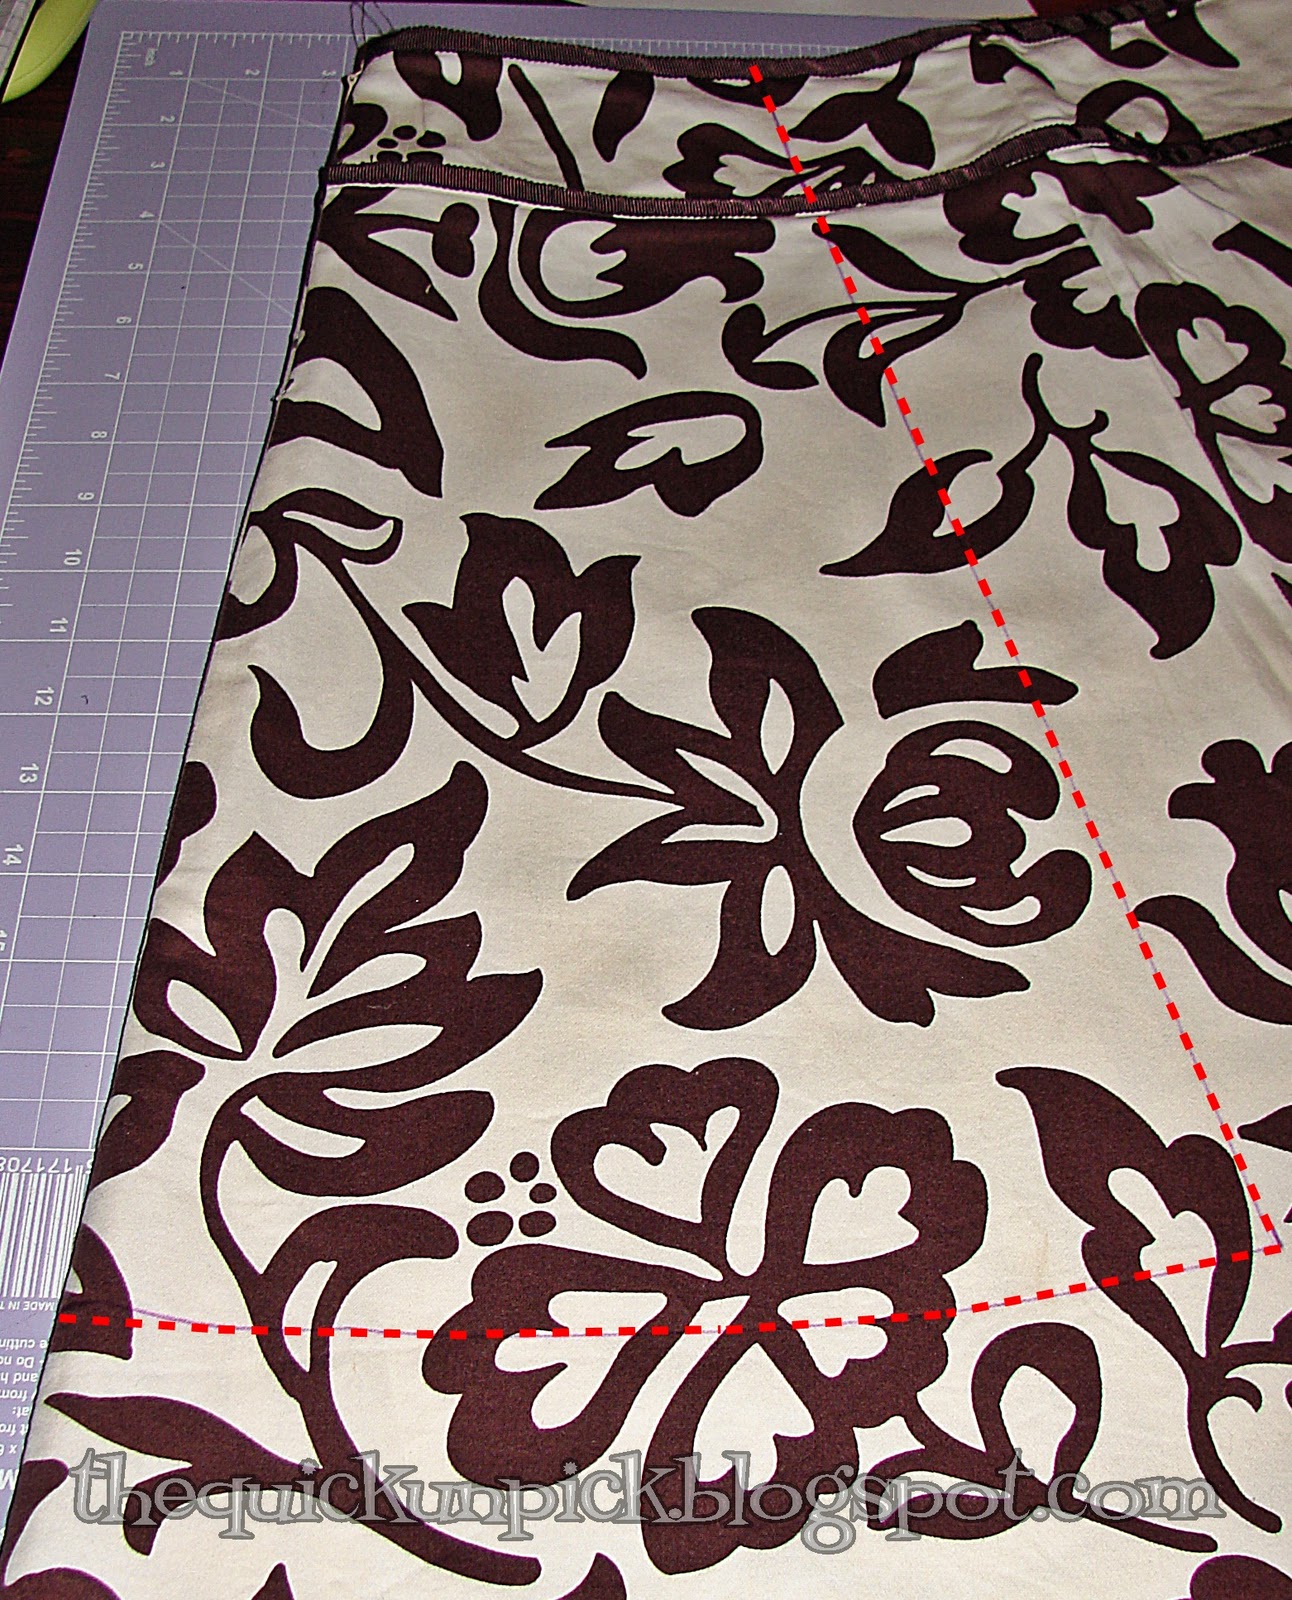
Cut rear panel being careful not to cut the front of the skirt… at this point we are just cutting out the back panel to put aside for later – this design retains the concealed zip at the centre back.

Measure and cut the front panel of the skirt part of your dress (I used the rear panel as a template of sorts for this) and set aside… I will be making the bodice from offcuts in the following steps.

Open up the remaining front panel of the original skirt you should have a panel of fabric left over… cut this at each of the side seams so that you a left with a long strip of fabric (it is slightly curved as it is the hem piece but you really needn’t worry because after you’ve finished the next couple of steps you wont be able to tell).

NOW WE SEW… adjust your machines stitch length to the longest setting (mine was 5) and reduce the tension to its lowest setting (mine was 0). Sew a straight gathering stitch (DO NOT lock stitch the start and finish) along the upper and lower longest edges.

Now you need to pull the bobbin threads (I actually sew two rows of gathering stitches on each length as I find it makes the gathers a little neater and more even – maybe its a placebo belief, I don’t know but whatever works I say!) Gather and ruffle the fabric until it matches the width of the top edge of the front skirt panel (see how it's now not really obvious that the fabric was originally curved a little).

To secure the ruffles… shorten your machines stitch length (I set mine at 2) and readjust the tension back to its usual setting, reduce pressure foot setting by one position and sew a straight line over the ruffles along each long edge parallel to the gathering stitches – this will lock the ruffles in place and means you can remove the gathering stitches now.

I drafted a rough bodice pattern as a guide to size (but if you are using an existing garment use it as a template) and placed this over the ruched panel... In the picture my pattern piece is a half bodice designed to go on the fabric fold however this step works better with a bodice pattern that shows the whole piece as if it were to be cut on a single flat layer of fabric - I was being too lazy to draw another piece so just made do). DO NOT CUT YOUR FABRIC YET...

Mark the outline of your bodice piece with disappearing fabric pen and then using that line as a guide sew a straight stitch over the lines that indicate the armhole and the side seam to secure the ruffles. I then used the serger (overlocker) over the sewn line to cut and secure the fabric in one step (I had previously tried to go straight to serging without the straight stitch but I found that the feed and cut action of the serger caused the gathers to unravel somewhat).

With right sides together attach the bodice to the front skirt panel (OMG...please ignore the fact that my serger is in desperate need of a clean...all that lint!). Press and topstitch to give the waistline a neat flat appearance.

Cut two strips (mine were 2" wide x approx 15" long) from the left over fabric to use for the halter neck ties. Fold in half with right sides together and press so that you have a strip 1" wide and stitch close to the edge along the long side to form one long tube.
Use a bodkin (or nappy/diaper pin) to turn right side out and press... these are your neckties. I finished off the end of each exposed necktie by wrapping and sewing a small section of contrasting ribbon over the end (see photo of dress back towards end of post).

Use a piece of scrap fabric from the skirt to cut a lining piece for the bodice (mine only covered 1/2 the bodice as I didn't want a lot of bulk added). Place right sides together with the bodice. Sandwich the neckties in position between these two layers and serge together as shown in the below photo:

Turn bodice and lining so it is now right sides out. Cut two strips from your excess skirt fabric to make into double fold bias tape - you will need a length long enough for both of the curved arm cycles on the bodice (The fabric you cut for the bias tape should be cut on the 45 degree angle to ensure it has optimal stretch around the curved armhole without puckering).

Attach bias tape to the arm hole on the front bodice piece.

(Apologies... neglected to photograph this step) Place and pin the front and back dress panels right sides together and sew/serge the side seams of the dress. Turn right side out... we're nearly there now...
Pin your contrasting ribbon around the waist of the dress and sew it on. (Ensure you fray check the ends) I doubled the ribbon over slightly at the beginning and end which was either side of the back zipper.

Finish your hemline by folding up, pressing and stitching the hem.

Embellish your dress anyway you see fit... I made a rolled fabric rosette and attached some ribbon before fastening it to one side of the bodice.

I also made a matching headband using a length of elastic and another rosette and ribbon embellishment.

And now, because I think she looks just adorable (and I always have a tough time deciding/narrowing down which photos to use), lots n lots of photos of Big Little Miss M modelling this Pink Polka Dotty creation...
(NOTE : this dress is a size 4 and Big Little Miss M is a Skinny size 3 at best so it is 'bulldog clipped' for a better fit so she could show it off)...


I hope you liked the tutorial... feel free to let me know either way! I am thinking about drafting a PDF pattern for this dress but it's going to be time dependent...
Big Little Miss M is off to her first day of kindergarten tomorrow :( & :) Sad that it seems like only yesterday she was placed in my arms as a newborn, taking her first breath in this world... but happy too because she's becoming such a personality packed, fun loving and individual little 3 year old (and she's soooooo excited that its a little infectious!).

I plan to share this tutorial far andwide with many fantastic and awesome linky parties hosted by even more fantastic and awesome bloggers. You can find links to them on my sidebar, features page and in other various places scattered about my blog - go visit, have a browse and discover amazing craftiness! I have listed a few at the end of the post but please dont feel I love your linky any less if its not there, it will be on the side bar and if its not pls let me know, its not deliberate...
So readers, leave me a comment, let me know you were here - even become a follower if you like... I really do love reading and (attempting) to reply to every one!
Cheers XOxo

LINK PARTIES:


This is darling! I could easily see an adult version as well. Thanks for the great tutorial!
ReplyDeleteOH.MY.GOODNESS.!!! Thank you for the tutorial...you are amazing! Love it!
ReplyDeleteShantel @
www.itsapricelesslife.blogspot.com
Love it! I have a few skirts laying around and would love to try this! Your blog rocks!
ReplyDeleteI just love the fabric. Great Tutorial :-) Posted your PIF today :-)
ReplyDeleteBy the way, head over to http://snips-and-spice.blogspot.com/2011/02/stylish-blogger-award.html
ReplyDeleteI have a surprise for you!
Adorable!
ReplyDeletevery cute! I love that you used the exsiting zipper in the design, don't know why i never thought of that! stop by domesticdeadline.blogspot.com
ReplyDeleteAbsolutely gorgeous! You are so very talented!
ReplyDeleteI just dropped by too, to say that I featured your baby booties on my round tuit post today:
http://jembellish.blogspot.com/2011/02/round-tuit-35.html
Thanks so much again for linking up! I hope you have a lovely week!
Jill @ Creating my way to Success
http://jembellish.blogspot.com/
Very well done! You have quite a talent and a lovely little model! Thanks for linking!
ReplyDeleteThat dress is awesome! Thanks for showing us how!
ReplyDeleteSaw this over at childmade. Just might have to do this with one of my skirts.
ReplyDeleteSaw this on a craft party. Love the dress! You did great!
ReplyDeleteGreat job, that is so cute.
ReplyDeleteHow creative and so sweet! Too bad I have 3 boys. I would sew bunches of these. :) Please share your creativity with my followers, link to my blog bash K.I.S.S. Happy to be a new follower.
ReplyDeletehttp://thetatteredtag.blogspot.com
P.S. I also host The Homespun Slate @ The Tattered Tag, a fun place to link up your on-line specialty shop. Hope to see you there. :)
ReplyDeletehttp://thetatteredtag.blogspot.com
Love the dress! Thanks for linking @Creative Itch's "Sew Cute Tuesday"!
ReplyDeleteSo cute dress, I love the beown and pink together! And a great tutorial! Thanks for sharing!
ReplyDelete/Mari
you always have the most adorable things! Have I ever asked you if you wanted to do a tutorial for Handmade Tuesdays? Also, I had no idea (at least this is what I am guessing :) that you were in Australia. I interned there last year and fell in LOVE with the country. I cannot wait to go back! (when I get some money!)
ReplyDeleteVery cute, what a clever project! You can also find all kinds of great sewing projects and tutorials at www.WeAllSew.com, I think you'd like it!
ReplyDeleteVery nice tutorial. I say if the zipper is there, you can make something out of it.
ReplyDeleteAdorable! I love the gathers in the bodice. I have been saving a magazine ad that is a similar style, with your tutorial I may get around to trying it out now.
ReplyDeleteSoooo cute! thanks for sharing!!!
ReplyDeleteAmazing! I love the gathered bodice and thanks for the tutorial. It makes it look do-able! Please link up! I have a linky party every Wednesday and it's still open today!
ReplyDeletewww.seaminglysmitten.blogspot.com
Jenny
Wow! That is brilliant and looks amazing!
ReplyDeleteThat's amazing - and your model is adorable!
ReplyDeleteCarrie
http://mycreativeescapes.blogspot.com/
this came out FABULOUS!!! I love the way you did the gathered top, looks great! Good job, great refashion!
ReplyDeletenice tuto
ReplyDeleteThanks for the amazing tutorial! I have always wanted to do a bodice like this one, but had no idea where to start.
ReplyDeleteese corpiño me tenia loca ya se como hacerlo ahora gracias =)
ReplyDelete