Jan 20, 2011

Selling refashioned clothing?

Have been busy with all sorts of things, the girls, a little sewing, a little sorting and organising - I just don't know where all the time goes!

I've had my mind on the online store today and wanted to pose a question to anybody that feels like giving me their opinion.

At this stage I have only listed a couple of things that have been made from scratch with new fabric... I am just wondering if people are at all interested in buying refashioned clothing similar to the ones I have done as tutorials here on this blog. I really love refashioning and want to continue making tutorials for them but doing at least one a week is going to seriously fill my girls closets (and trust me they are already over flowing!) and some pieces are almost too nice to cut down all the time to a size 1T or 3T... Hmm just thoughts???

I did list some baby slings today though - did you notice Little little Miss M's baby made the photo - I love props that stay where you want, smile on cue and make so little fuss - LOL I really wouldn't change a thing about my girls but gee we've had a pretty full on couple of days - I think Little little Miss M is very headstrong (like her mummy!) and it makes for interesting time... check the slings out if you like via the Shop at Spangle tab up top. Hey and while I'm talking baby slings would that be a good product for a follower freebie promotion?
And stay tuned, hopefully tomorrow (or the next day) I'll post my latest refashioning tute...


Jan 18, 2011

What I’ve been working on…

Well, I’ve been busy sewing up a few things from scratch – just for a little (but only very short) break from refashions.

Here’s a few bibs I’ve been making (going to dive into the world of online stores soon… and yes there will be some cool giveaways for my followers!):

bib range2

Also a skirt that I want to make a PDF pattern for (it’s not quite finished yet – I have to put the belt loops on and you can see there is a faux placket on the front of the skirt… I will put three fabric covered buttons on it):

twirly denim skirt

denim skirt

And do you remember that decorator canvas fabric that I used for my Stitched Photo Canvas Tutorial… I mentioned that I’d bought a whole big roll of the stuff because it was on markdown. Well, I used up a little more to recover some square canvas boards:

canvas recover

And also to make some co-ordinating cushion covers:

canvas cushions

And a work in progress is a roller blind for our front glass door… (No picture yet… have to wait for the girls next nap to finish it off!).

Well, the girls are stirring so it’s time to go for now… hope you are all having a marvellous, crafty, creative and productive day!

Jan 17, 2011

The Reincarnated Napkin Skirt…

Okay, so yesterday I gave you all a peek at this skirt that I’d made for Little Little Miss M:

TaaDaa

And for a little fun I asked you to guess what I might have refashioned it from. As you can see from the title of this post, it was in fact originally a napkin! Most who had a go at guessing were pretty close but Amie from kitty cats and airplanes was spot on!

Anyhow, it gave me a days grace to get the tutorial together – this is a SUPER EASY project that anybody could have a go at!

Supplies:materials

  • 1x Square (21” x 21”) napkin
  • 2x strips of contrasting fabric for waistband (4.5” x 21”)
  • Length of elastic for waistband (mine was 18” but it will depend on the size you are making)
  • Usual notions, thread, scissors, sewing machine & serger (optional)

Construction:

I chose this napkin for a few reasons; it was on markdown ($1.40), I liked the vintage type floral print and the trim was a nice detail. The skirt will be constructed by folding the napkin in half, cutting it to form a front and back and adding an elastic waist.

Here’s how I did it:

side trim


Lay napkin flat and use scissors or a rotary cutter to cut the trim from the two sides that will form the side seams of the skirt.


half napkin


Cut napkin in half as shown, from one raw edged side to the other (I pressed the napkin prior to beginning the project, folding it in half and pressing a fold into it to help act as a guide for this step).


overlock waist


With right side of fabric together serge or sew the waist panel to the top edge of the napkin half (complete for both halves of the napkin). If using a sewing machine zig zag stitch the raw edges to prevent fraying and to give a nice neat edge.


serger


I used a overlocker and finished the top edge of the waist panel also at this point.


waistband


Press the seam you have just completed upwards towards what will be the top of your skirt.


Fold waistband in half lengthways and press a seam into it but open it back up at this stage after pressing.


Sorry, no photo for this step, but its a REALLY easy one! You should now have two panels, each with a contrasting waistband fabric attached. One will become the front panel of the skirt, the other will be the back.

Place both panels right sides together, ensuring you match up the hem and waist seams. Serge or sew the two panels together along both side edges. You should now have a tube that is beginning to resemble a skirt body.

Flip skirt right side out and fold down the waistband along the pressed guideline you did earlier.

topstitch 2Topstitch around the waistband as shown in the picture with the white cotton seam (this will catch the waistband that you have folded over – ensure you leave an opening of about 1.5” to allow you to insert the elastic after the next step).

(Optional) Topstitch along the top folded edge of the waistband the same distance from the edge as you did for the first waist seam – see presser foot placement in the above photo.

bodkin


Use a bodkin or safety pin to insert your length of elastic into the waistband casing.

Sew both ends of the elastic together with a zig zag stitch (ensuring that the elastic is not twisted in the casing) and then sew the opening in the casing closed.


OKAY…. Time for a VICTORY DANCE! WOOHOO! How easy was that! I have to admit I just love repurposing/upcycling/refashioning. I am always on the lookout for items that could be made into something else – especially at thrift stores or in the markdown bins. This napkin was only $1.40 and I just love that I didn’t have to hem it – it already had a beautiful subtle trim detail; and the print – I think – is just gorgeous.

finished skirt

I hope you liked it too! I will be linking this project up to some of the FABULOUS link parties over there to the right in my sidebar – Please check some of them out, they are a wealth of inspiration and creativity, not to mention that the hosting sites are also fantastic – but while your here please check out some of my other tutorials and my blog in general. I love reading your comments and any feedback is always appreciated!

TaaDaa

I am contemplating hosting a linky party once a week here on The Quick Unpick called “The Reincarnated Roundup” which will be for anything that has begun life serving a different purpose to the final result but I’m not too sure whether there is already enough linky parties out there… is this something that YOU, who read my blog from time to time would be interested in????

Hoping you have all had a wonderful start to 2011!

Jan 16, 2011

The Reincarnated??? What was I before…

Well, here’s one of the things I’ve been working on tonight:

TaaDaa

I made this skirt for Little Little Miss M. It’s another upcycle project – this one costing a grand total of $1.40. But before I post my tutorial and how to this time I thought it might be fun to have a little guessing game…

So as the title of this post asks, What do you think this skirt was before? Here’s a few bits of info about the skirt now… It’s 100% cotton & the only thing apart from thread and elastic that wasn’t part of the original item is the red waistband fabric.

So have a think, leave a comment, follow me if you like, have a read of a few of my other posts and tutorials and be sure to check back for the full tutorial and reveal… Because this skirt is The Reincarnated….?


Jan 15, 2011

More on the Boot Sleeves…

Just thought I’d give a quick little update on the BOOT SLEEVES

boot sleeves 1

Thank you so much to everyone that commented. The response and comments I have gotten for these has been really fantastic – Its really nice to know that people like what you are making. I am currently working on an actual pattern for these but with a few tweaks and improvements on the original.

And remembering that I paired them into an outfit:

toddler knit

Well, a few of you wanted to see them (the boot sleeves) with another outfit ie. not so co-ordinated. So here’s a quick couple of photos:

randa

I do like how they look paired with a non matching outfit – Big Little Miss M really got quite a few compliments on them!

And just because Little Little Miss M likes in on the photo action… Here’s my two funny munchkins – they make me laugh sometimes

DSC08305

Jan 14, 2011

It’s looking like a pancake kind of day…

more pancakes pancakes pancakes

This morning it is pretty wet, windy and a little miserable outside so it’s the perfect kind of morning for a plate of warm pancakes with lemon & sugar. YUMMO!

Here’s the recipe for the most delicious and fluffy pancakes:

    1 1/2 cups Milk

    2tbs Sugar

    Juice of 1 Lemon

    1 1/2 cups Self Raising Flour

    1/4tsp Bi Carb Soda

    1 Egg

    1 1/2tbs Butter

    1tsp Vanilla Essence

  • Mix Milk, Sugar and Lemon in a bowl and leave aside for about 5 minutes. It will kind of curdle but it’s supposed to (trust me this makes your pancakes super fluffy and light)

  • Sift flour and Bi Carb Soda into a large bowl

  • Melt butter and combine with lightly whisked egg vanilla and milk mixture.

  • Pour wet ingredients into to flour and whisk till smooth – don’t over whisk or mix too much as the more you mix it the tougher your pancakes will be, it’s okay to have some lumps in your mix.

  • Pour/Ladle spoonful's onto a lightly greased and heated pan on medium heat and flip once bubbles are forming on top.

  • DELICIOUS with sugar & lemon or your topping of choice!

pancakes pancakes pancakes

Now, as we all sat down for breakfast as a family the irony of blog posts and photo’s struck me… WHY? you say. Well, because the photo you see is a nice organised plate of pancakes, presented (I think) somewhat nicely on one of my favourite square plates. The reality though is that we ate off plastic kiddy plates (no nice fancy china plates in this house – at least none that we’re using whilst the kids are still dropping things all the time) in our PJ’s and Little Little Miss M spent 80% of the time eating with her index finger firmly planted up one of her newly discovered nostrils. Yes, life with young children really is unique, real and often not nearly as ‘pretty’ or organised as the photo’s appear – but who’d have it any other way? Not me…

Jan 11, 2011

50c Thrifty Refashion…

Okay, quick recap. This is the top I started with:
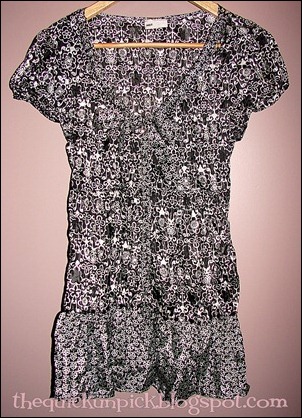
original size 10 womans blouse
Now to find out a little more about the original top you’ll need to visit this post which will help make a little more sense of this ‘how to’.

The only items I used for this refashion were the usual notions and sewing supplies plus about 1.5 meters of satin ribbon. So all up the total cost of the finished outfit was UNDER $1 (50cents for the thrift store top, about 30cents of ribbon, and everything else I used was in my sewing box.

Here’s the end result:

finished 3
I definitely think this looks fantastic for the cost. What do you think? Here’s how I achieved the final look:
Firstly you will need to size up the original piece of clothing to determine how much to reduce the size. You can do this with an item of clothing in the correct size or by doing a fitting type measure up. I had my Big Little Miss M try the top on and then just measured the shoulder and neckline area to see how much needed to go.
This top was a button up style blouse with 9 buttons/buttonholes down the centre front placket. I removed all the buttons except for the top two – so that the dress would be easy to get on and off.

buttons1*** CLICK ON THE PICTURES TO ENLARGE & READ NOTES***

Cut top as shown in the picture along the shoulder seam and across the back and front neckline. I used the original seams and angles as a guide to the angle for the new cuts. Remove the fabric drawstrings from the front neckline casing.

cutting original
As shown in the picture fold over the back neckline twice and stitch in place. I used a rolled hem foot to create a very narrow hem on this edge.
 
rear neck
Sew a basting stitch along the arm seam from the back neckline to the same point on the front. I used my sewing machine set to the longest stitch length and without doing locking stitches. Pull the bobbin thread to gather and create ‘sleeve puffs’. Secure the gather threads so they don’t unravel.

arm gathering
Cut two lengths of ribbon approximately 40cm in length and using a bodkin or safety pin insert in casing either side of front neckline.

ribbon casing

Close shoulder seam by flipping garment inside out and by matching up the neckline openings sew right along the top shoulder from the neckline right over to and including the gathered sleeve puff.

This will also close the casing and secure the new ribbon in the neckline casing.
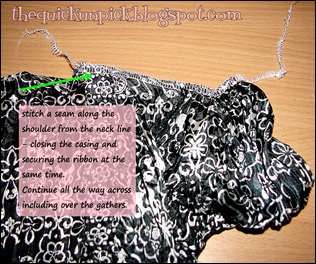
shoulder seam
Now, remembering that the original top had sleeves that were elasticized at the opening, I unpicked a small 1cm section in an inconspicuous section and pulled some of the elastic out. I shortened this elastic to a more appropriate size and then restitched the elastic and casing closed.
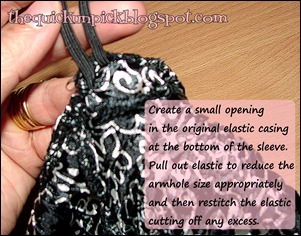
arm casing

I wanted to have a gathered waistline (and to draw in the size of the garment without having to cut and resew the side seams) so I used a length of ribbon sewn the length of the waist to form a casing for 1/4” elastic.

I didn’t insert the elastic just yet however as I wanted to create a shirring feature on the back of the dress (this too helped reduce the size and create overall shape).
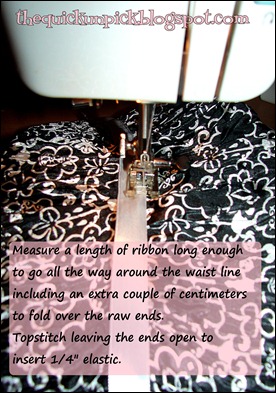
ribbon waistband
On the back of the garment I measured in approximately 1”from the shoulder seam and stitched a basting stitch vertically to the waist line – I didn’t lock stitch this as it will get removed later, it purely acts as an easy to see guide for the width of my shirring rows.

shirring guides
I then shirred approx 25 lines of shirring between these two vertical guidelines beginning and using the already there waistline seam as a guide for the first row. I always begin shirring with a locking stitch (twice for good measure), the elastic hand wound onto the bobbin, regular thread for the upper thread and with normal machine stitch length and tension.

I complete one row and do another locking stitch but without cutting any threads I simply lift the needle and presser foot, turn the fabric and move up so that the finished row sits in line with the EDGE of my presser foot and this will guide the next row. I begin and end EVERY row with locking stitches but I don’t cut the elastic or thread until I finish all my rows. Here’s a really basic picture (I took a photo of the shirred rows but the busy fabric made it hard to see – so I used the computer to ‘draw’ an example of I did my shirring rows… hope it helps):
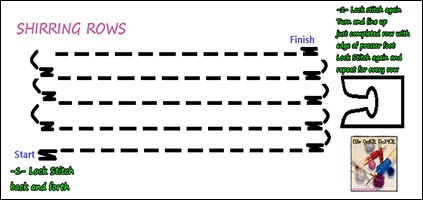
Shirring sketch

Now after completing what looked like a column of shirring on the centre back I fed the 1/4” elastic into the casing I did earlier with the ribbon and folded the extra centimetre of ribbon over  on the placket without the buttonholes and sewed the casing closed securing the elastic at that end. I then repeated on the other side but before sewing closed I overlapped it with the opposite side, lining up the waistband and sewing both layers together.

sew together placket

I then overlapped the plackets from the waist to the hem and topstitched them together down both sides of the placket as I had earlier removed the buttons from this section and did not want it to open like a shirt.
Okay, so I did a little victory dance now – because it’s pretty much done!
Here it is:.

finished dress


sneaky peek

And here’s Big Little Miss M in the dress:

finished2

I love how the shirring column and the back neckline kind of like a mini Elizabethan collar…
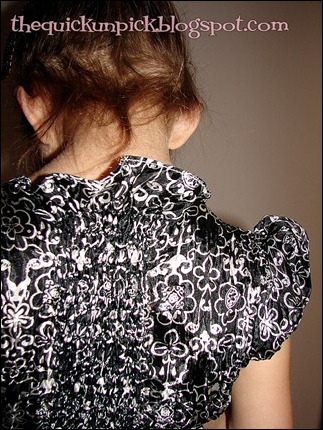
back shirred panel and collar
I think the white ribbon bow and waistband help break up the busy-ness of the fabric and I like the girly puffy sleeves! (The old drawstring from the neckline was re-used for matching hair ribbons)

finished 1

Big Little Miss M was in a little bit of a mood when I took these pictures (Is it obvious from the really bland expression?)

But she sparked up a little when I told her to go wild and have a twirl!

finished 3
finished 4

Hope you like it – all for less than $1…. I AM HAPPY. I think it has a rather classical but girly look (I am a little biased though!).

Thanks for taking the time to look through this post and if you have a chance be sure to have a browse around my blog and check out some of my other tutorials and adventures (I’d love to have you become a follower too if you like – that way you’ll be sure to not miss any of my refashioning or from scratch tutes!). Also be sure to check out some of the wonderful blogs that host link parties (on the sidebar) for an endless supply of craftiness and ideas!
Oh… and while I think of it I am contemplating having a follower giveaway soon – I’ve made a couple of items from scratch as ‘testers’ for final products and patterns that I will be marketing soon in either an Etsy or Madeit store – what do you think? Would any of you like that?

And on a final much more serious note … please keep all the people affected by the floods here in Australia in your thoughts and prayers – it really has been an unbelievable tragedy, already such tragic losses and unfortunately the next few days look set to be worse still. Nature is such a beautiful thing because it is wild and untamed, free and uncontrolled but that same beauty can be absolutely tragic for those very same qualities.
My thoughts and prayers are with the families, friends and loved ones who have lost loved ones, homes, businesses or livelihoods…

Cheers

The Spangler x0


Related Posts Plugin for WordPress, Blogger...