Did you play with and dress paper dolls when you were a little girl? I did and I loved them... in fact I still have quite a nostalgic affection for them.
What I never loved about paper dolls was how I always managed to tear the most loved outfit... or a paper tab would fall off from being folded and unfolded one too many times.
My two girls, Big Little and Little Little Miss M are only 4 and 2 but I've really wanted to share more of the things I loved as a child with them... they both are somewhat innocently heavy handed with toys - as kids their age are entitled to be. So I always thought paper dolls would have to wait a few more years yet... but...
...a few months back Big Little Miss M was given a felt board as a gift. It had a felt cut out doll and felt clothing and accessories - she LOVED it! I pondered buying more for her and her sister but they were a tad expensive and really basic looking - they were pretty much just plain felt shapes etc... plus I thought I could make some up myself!
So that's how the "Printed, Fused, Fabric 'n' Felt Paper Dolls" came to be... I have been meaning to do this project for months... I've seen felt paper dolls online but they are quite different to what I've done here. I haven't seen them made like this online, but the web is wide and vast and it's very likely it may have been done before but anyhow, here's how I created my durable and (biased opinion) very gorgeous fabric 'n' felt paper dolls. The tutorial may look a little daunting and like there's lots and lots of steps, but it really is a single afternoon project that comes together really easily.
SUPPLIES
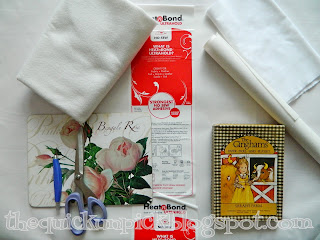
Original paper doll set (or printable download)
White Cotton Fabric (enough to cover 3x A4 pages)
Freezer Paper (1x A4 sized page)
Heat 'n' Bond Iron on Adhesive (3x A4 sized paged)
White Felt (3x A4 sized paged)
Couple of extra felt squares
Printer/Scanner
A4 paper
Baking paper
Scotch tape
& scissors (for fabric and for paper)
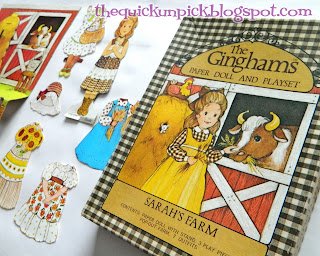
Here's the original vintage/retro paper doll set (which I bought from this fabulous little Etsy store that has a gorgeous and eclectic range of vintage goods,
EmmyLucy)
I loved that it came with a backdrop scene, accessories and quite a few super cute outfits for 'Sarah' - 6 dresses, 2 hats, 2 head scarves, wheelbarrow, pitchfork, cat and even a chook!
The paper doll set being as old as I am, it - like me - has acquired some wear and tear over the years, but - and again, hopefully like me - has weathered the prior years rather well.
1. If you are not using a paper doll download that is already on your computer you will need to scan your paper pieces in. Try to position them so they won't take up the whole A4 page - you will at least a 1/4 to 1/2 inch border... you will see why later.
2. Once you have the images selected and scanned on, mark one corner of the first page in your printer (to enable you to easily work out which way you will later feed your material and paper through).
3. Then print off a draft of each page in greyscale to be used as a guide in the following steps.

4. Cut your white cotton - it needs to be nice and wrinkle free, so take the time to iron it if needed... trust me, if you don't you'll just find yourself needing to redo the prints and possibly also struggling to unjam your printer... and no, not learned from experience but I will not be held responsible for damaged printers... lol.
Your cotton should be cut to be a little smaller than the A4 paper size - check though to make sure all of your printing area is covered by fabric.
5. Now for the freezer paper, fabric printing - you can find tutorials all over the internet for how to print on fabric... this is how I do it and my preferred method of doing so. If you have another method choose whichever works best for you.
Cut your freezer paper (remember NOT to use your fabric scissors for this) so that it is roughly the same size as your cotton sheets... doesn't need to be exact but try to keep both the fabric and freezer paper edges fairly smooth, you're going to want your printer to feed it through without snagging.
6. Using a hot iron on the steam free setting, place your cotton sheet on the ironing board and then lay the freezer paper on top with the glossy side down and iron over the paper. This will cause your fabric to adhere to the freezer paper... don't worry about any overhang onto the ironing board it lifts off without leaving any residue as it doesn't really melt, it just gets tacky enough to hold the fabric.
Allow it to cool before proceeding... only takes seconds.
7. Then using just a little scotch tape on the edge that will feed into the printer first, attach the fabric (with the freezer paper attached) to the draft sheet with the fabric facing up. You want to make sure there's no curled corners or fabric hanging over the A4 paper edge as you want it to feed through your printer without jamming - so don't go overboard on the tape either... just enough to hold it together at the top edge.
Then place the sheet (which should consist of three layers - A4 draft page, freezer paper & cotton fabric) into your printers paper feed using the earlier marking on the draft to figure out which way it should go in so that it will print on the fabric.
Carefully separate all layers and use your iron (again without steam) to set the print onto the fabric. I do this the first time with the print face down and then again a second time face up.
Repeat this step for however many pages you have.
I re-used the same freezer paper for each print out, it looses it's glossiness after the first print but still sticks the fabric just fine - why waste it if you don't have to?
8. Now to apply the heat 'n' bond to the printed fabric...
...follow the first steps on the product to use your iron to attach the heat'n'bond to the wrong side of the cotton prints. For this step I put a little extra baking paper under the cotton as the heat'n'bond will melt onto your ironing board if it overhangs the cotton... and it is a nightmare to remove - this one.... I know from prior experience :P
9. Now here you deviate from the regular instructions for creating fusible appliqués as detailed on the heat'n'bond packet... DO NOT cut your shapes out yet!
Once the heat'n'bond has cooled remove the paper backing and place the fabric onto the felt... I put the background print onto a blue felt square whilst all the clothing, accessories and 'Sara' - the paper doll - were placed onto the white felt.
Use your baking paper and bond the felt to the fabric using your hot iron.
10. Now you can cut out your 'paper' (felt) doll and all the accessories... can be a little time consuming but not hard to do - use sharp fabric scissor for this to keep your edges nice and clean.
I also used a craft, kind of scalpel thingy (some one tell me what it's called - I have a major mental block... I've been looking at the said thingy for a while now and it's not coming to me... grrr) to easily cut out the face hole on the head scarves and to cut some slits into the hats for easy felt doll wearing.
How cute is she looking?
I LOVE the detail and texture that can be achieved printing onto a nice cotton fabric... this is why you took the time earlier to iron your fabric nice and smooth - any wrinkle would effect the print quality.
12. Then I decided at the last minute to make it into a felt book of sorts by sewing another square of felt to the background square... I will make up a cover print for the front tomorrow using the original box outer as the scan image and probably put either a couple plastic snaps, a button or velcro onto the outer corners to hold it closed when not in use.
And there you have it... it's been a long time between dances but it is definitely time for a victory dance, because your done... you now have a gorgeous printed and fused, felt paper doll that will withstand most typical toddler abuse!
My girls are going to love me in the morning for this.... heheh, they so wanted to get their hands on the paper set when they watched me begin this project, but now it's all packed away to hopefully see another generation of play - it surely would of struggled to last 2 minutes in the hands of my two... but the fabric and felt? Almost untearable!
Such a handy bonus... they will get the love and joy of a classic and educational toy, whilst I will have the quiet satisfaction of knowing they'd have a hard time destroying my felt version and that the original is safely stowed away... it's truly a WIN-WIN!
So now here's a look at all 'Sarah of The Ginghams' in all her outfits:
You will notice the felt cut outs have no tabs like the traditional paper dolls, this is because the felt will hold sufficiently on its own.
I hope you enjoyed the tutorial... enough perhaps that you'll give it a go. Printing on fabric is really so easy and opens up so many crafty possibilities... and I just love heat'n'bond - no need for sewing and no fear of fraying!
Don't be shy, leave a comment, give me some feedback, ask a question or show off your own attempt at the felt paper dolls or just say hi - I love reader comments... and as a SAHM adult interaction is nice too!


