Sep 24, 2011

A hair cut that's been a long time coming...

I like long hair on my girls and loved every strand on their little heads! I held out for SOOOOO long but the time finally arrived for Big Little Miss M to have her FIRST EVER haircut. This was a big deal for me and her!

It only took 4 years, 2 months and 29 days to get there!

For such a while I'd lamented just how fine and whispy her hair was - especially every time I tied it back or tried an up-do, but at the same time I loved that it still felt like baby hair, had the most gorgeous blond sunbleached ends and even the very fact that not a single hair on her head had ever encountered a pair of scissors.

So, so many people had suggested that if I just cut or trimmed her hair that it would thicken up...

My big girl began asking about getting a haircut a couple of months ago... so after much to-ing and fro-ing,  and internal debate, out came the scissors and after a few before shots and a snip here and there my girl had had her very first ever haircut.

THE BEFORE (mug)SHOTS

She sat so still for me and in retrospect she was obviously a little nervous.

THE AFTER SHOTS

 Why do I think she was nervous? Well, because it was with typical childish innocence that after I made the first snip and proudly showed her the lock of hair we were going to keep as a memento she exclaimed,
 "But Mummy, it didn't even hurt!"

How perfectly logical for my little girl, who's always been told to never touch my sewing scissors, been warned of how knives can cut and who understands that cuts and scraps can hurt, to unwittingly believe that the act of haircutting may carry some of that same pain.

It would never have occurred to me that she may have thought this way but the joy in her discovery of the painless haircut made this memorable occasion even more endearing and special!

And here's my little one doing some crazy eyes as she checks out her brand spanking new fringe (aka bangs)


Cheers till next time ☺


Sep 16, 2011

Fondant Quilling, The Ballerina & the Bumblebee plus a little of the everyday

The days seem to bleed into one another and weeks seem to be merging into a blur of the everyday...


It's September and the beginning of Spring... I love Spring! It means more sunshine, more warmth and generally for me just a sense of being renewed after the wet and windy winter weather. This winter seemed to get to me more than any other before - it seemed colder, longer and generally more miserable. The girls and I and even hubby seemed to be on an endless merry go round of winter colds and flues. I've the remnants of one clinging on at the moment and even lost my voice for a few days (a bonus for the hubs I'm sure!)

Anyhow, did I say it's Spring? Yay! The sun has been out and the weather has been glorious for the past week or so.


Last week I tried my hand at fondant quilling... I had never seen or heard of this until I saw a couple of amazing cakes on Pinterest... and well I was determined to give it a go. I made up a batch or so of marshmallow fondant (recipe can be found within THIS post) and coloured it up nice and bright: 


Why the bobbin? you may be wondering. Well, the only cake decorating shop within about 100 kms or so did not have any fondant ribbon cutters in stock and I had left this cake till the last minute to make and didn't have the time to order one online ... It was to celebrate the 50th birthday of the lovely lady, Judi (yes, I spelt her name wrong on the cake - I was sure at 1am the night before that there was only one way to spell Judy... never mind she loved it anyway!) who volunteers and operates one of the fabulous church affiliated playgroups I attend with my girls. So I made do with what I had and the only thing I could think of that would give me nice even strips was the bobbin... and with the aid of a toothpick it did a reasonable job! Here's the finished cake:


I'm happy with my first attempt but there certainly is room for some improvement... my attempt at marbling the fondant on the base cake really went kind of mucky coloured rather than the wonderful rainbow swirls I'd been picturing in my head!

The girls and I have been having walks in the local fauna park... we are so lucky to have such a wonderful and educational facility only about a kilometre from home - its a huge park where kangaroos, emus, ducks and more just wander freely and then there are the walk through bird enclosures as well as reptile and snake enclosures (thankfully not open range). The girls absolutely love going there to spend a few hours just wandering through nature and admiring the flora and fauna...

Here they are jumping like kangaroos just after we walked into the park....


And here's some of the local inhabitants....

one of the dingos (they have about 5 at the park including one white -I think albino- one but it wasn't about on this day)


The emu's which wander freely...


One of the water birds...


Some blue tongue lizards which look like they're loving the sun as much as I do (although not too keen on the human interruption to their sunbathing)...


The girls wondering why the ducks scatter every time they try to catch them... hmmm... if only you could hear my two squealers as they run about the park!


Unfortunately we'd gone in the middle of the day this time and a lot of the girls favourite animals were sleeping... the wombat, the kangaroos and their favourite - the koala's... but even more reason to pop by again on the next sunny day when we have an hour or two to while away!

And my Big Little Miss M also had her first ballet concert a couple of days ago... being a first time concert mum I learnt a few things... 1. Even the baby ballerina's (including my 4 year old) must have a full face of makeup - Big Little Miss M loved this, I was not as keen.... (even though I nearly teared up when I saw her all dressed in her tutu)
2. You cannot take photo's or video during the actual stage performance... 
So here's my favourite photo I took of her at the ballet school for her dress rehearsals...


And because Little Little Miss M wanted in on the dress up action, I found this bumblebee costume in the $5 discount bin... the BEST $5 I've spent in a long time - she LOVES this costume and even wanted to sleep in it (tantrums aside when it came time to get her out of it) I even love the way she says "mumble-me" over and over when she's wearing it!


And just because it makes me smile here's the girls showing off their awesome twirling skills! 

The Ballerina aka Big Little Miss M:


And my Bumble Bee aka Little Little Miss M: 
I love the wind up she has before every twirl!


There's something so beautiful and free about watching little children dance and twirl and take absolute delight in something so simple... one of my most happiest memories of childhood is being outdoors on a sunny day all by myself in my favourite dress, just twirling!

Wishing you all a little twirly delight and magic...

Till next time
 xx


Sep 6, 2011

Free Flutter Sleeve Custom Made SpaNGle* Dress

Good afternoon blogland! Sorry, if you've come by for a post on a tutorial or a refashion... sadly I've been a little time poor (read: disorganised) lately and it seems everything always happens at once... hopefully I'll have one for you soon.

In the meantime, for anybody coming by today from Facebook... There is a MASSIVE pre-loved baby girls clothing sale going on at SpaNGle* and one lucky buyer is going to win one of these dresses:


Here's how:

1. One gift with purchase (GWP) will only occur if SpaNGle*s facebook page reaches another 20 likes before sale opens at 8pm (AEST) tonight.

2. If GWP is to be held (conditional upon above point) it will occur approximately 45minutes after sale start at 8:45pm.

3. Using the photo numbers of sale items to provide a number range, Random.org will be used to generate a winning number.

4. If the item corresponding to that number has been purchased that buyer will receive a complimentary SpaNGle* dress similar to that pictured above in the size of the item purchased.

5. If the corresponding item has not been purchased the process will be repeated every 5 minutes until someone wins!

6. BONUS.... if winner is a follower of this blog they will also receive a matching headband - but you must have left a comment below letting me know you are a follower PRIOR to the start of the sale!

7. Random.org screen shots will be added to this post to detail the winning number along with status and photo comment update to notify winner....

GOOD LUCK and don't forget to follow the blog and leave a comment below to be in with a chance at winning the headband too... oh and spread the word! We need to reach the magical extra 20 'likers'.

Cheers ☺


****UPDATE**** WINNER - Free Gift with purchase Winner as chosen by Random.org @8:45pm tonight..........


Congrats... Leonie SMITH - you pick up a free Flutter Sleeve Dress with your purchase!

Woo Hoo - time for a victory dance I say!

***NOTE: Oh, I just realised... in case anyone else was wondering... I removed two photo's from the Pre-loved sale album, after conducting the Gift with Purchase promotion and this changed the numbering on the photos with regards to who was the winner of the Gift With Purchase... Photo 117 received the bonus - that photo is now displayed as 115 but is still the lucky purchase item! ***

Aug 23, 2011

Thrift Shop Love...

We all love a bargain don't we? And some of us love thrift shopping - where bargains can definitely be found a plenty (Here in Australia thrift shops are more commonly called Op Shops ie. opportunity shops)!

Here's a few of my latest thrifty 'opportune' finds:

I love retro, so imagine my joy when I stumbled across this gorgeous fully operational (and electrically tested) retro Sunbeam Mix Master... 


It came with both milk bowls and the regular beater attachments! LOVE! So how much would you pay for this?


$10????


NO! Not $10 but only $8. That's right... only $8. I think I got an absolute bargain. It has a few signs of wear but considering its probably around 40 years old it's in really good nick! Besides, $8!!!! 

I also really love retro patterns and picked up three super cute childrens patterns from the late 60's and 70's that really will still look cute and fashionable in comparison to modern girls dress fashions.

Here they are:


They are all complete too - with one even being uncut!

Now, I had to have a chuckle when I had a closer look at the patterns in the store because on the pocket sleeve one clearly stated this: 


NOT SUITABLE FOR CHUBBY GIRLS

And another had this: 


SUITABLE FOR CHUBBIES

I really don't think you would find this on any pattern out there these days! It made me chuckle... and feel a little sorry for any 'chubbies' back in the day.

But there you go... back in the 60's and 70's it apparently was okay to be what now I think might be considered a little in your face! ☺

Happy Days and I hope to have you back soon... leave a comment, let me know what you think of my finds or just say hello - I love receiving and reading your comments!

Cheers ☺


Aug 22, 2011

Sugar City Village Frock

I have for a long time eyed off the Sugar City Village Frock with such envy and disappointment that the pattern is no longer available... Such a gorgeous and unique, somewhat retro style that makes me want one in my own size! This dress pattern truly seems to have a cult following!

Some time back, through the kindness and amazing generosity of another fellow blogger - from the other side of the globe no less - (who at this point shall remain nameless, lest she be absolutely bombarded with pleading requests!) I was able to have a lend of this amazing pattern to whip up a Village Frock for my Big Little Miss M... ah LOVE! My somewhat crazy love affair with this dress is now complete - although I know I will be making both my girls more of this super cute, very trendy dress!

And to the gorgeous blogger who sent the pattern all the way across the ocean - you know who you are - I have a surprise on its way as a very grateful THANK YOU!

Here's my big girls VERY OWN Sugar City designed Village Frock:


The fabric is a super soft, light weight, black and white herringbone fabric which just drapes BEAUTIFULLY... however is a bit of a pain to cut and sew - being a soft woven fabric it tended to move a bit much like cutting and sewing satin of all things (strangely); it also suffers terribly from excessive fraying... nothing a quick serge on all the seams didn't fix, but it still made all the gathering just a little more interesting ☺.

Here's a close up of the fabric and the amazingly cute ladybug buttons:


And on the dress:


A little more Village Frock love: 


And just because my other little munchkin is a lil cutie patootie too.... Little Little Miss M:


Bad camera shot/settings... but still gorgeous... 


So, do you harbour an unhealthy love affair with the Village Frock or another pattern? I'd love to know!

Cheers


Sharing this little project over at these fabulous linky parties....
Sew Can Do

Aug 20, 2011

Heavenly Imbibed Hazelnut Hybrid...


I love when I find the time to bake... I've often thought that I am a better, more balanced and generally more pleasant person to be around when I've had a chance to bake or cook something special. I guess it's somewhat cathartic to be able to start with a selection of ingredients, then to combine, mix, blend and bake up a storm to create something delicious and special to share with friends and family. I do believe they (whoever 'they' are) are right when they say that cooking comes from the heart and can be an expression of love.


Here's my latest baking effort.... I give you my Frangelico Hazelnut Cake & Nutella Cheesecake Hybrid....

"Heavenly Imbibed Hazelnut Hybrid"


It is basically a Nutullea Cheesecake sandwiched between a  Frangelico Hazelnut Cake that has been glazed with Nutella ganache. 


Now, the separate recipes are not my own but have been tweaked a little by me and based on some gorgeous recipes that really hold their own individually... but sometimes when you can not decide between two recipes there's not much else to be done but to combine them and have both!


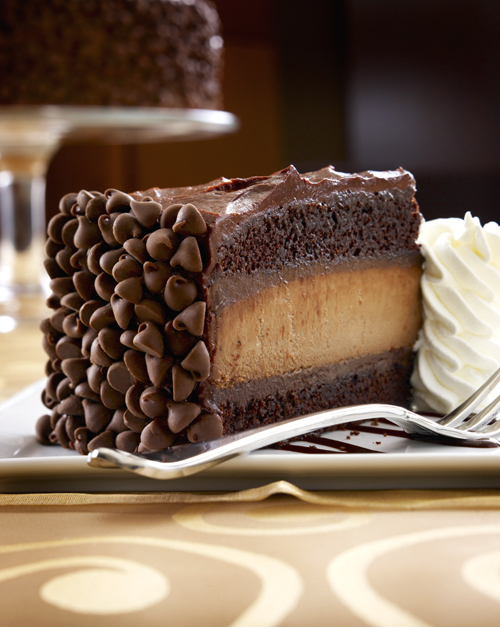
Here's the photo that first gave me the inspiration (compliments of my Pinterest addiction - you can follow my pinterest addiction HERE if so inclined... I love the company - let me know your email in the comments if you'd like an invite!)...


Holy moly -- the new Hershey's Chocolate Cheesecake at the Cheesecake Factory. (Photo courtesy of the restaurant)


Now, I'm led to believe that the cake is a Cheesecake Factory Hershey Chocolate Bar Cheesecake. I almost instantly fell in love with the idea of combining cake and cheesecake... so began the search for a suitably decadent cake and cheesecake to replicate this little beauty!


It only seemed fitting that due to my new found obsession with Nutella that the cheesecake be a Nutella cheesecake (inspiration recipe can be found HERE at Chocolate Suze) and then it seemed to make sense that a hazelnut cake should complete the hybrid. And to cut a long story short that then reminded me of a friends love affair with the liqueur Frangelico and after a rather quick Google - because honestly "if you can't google it, it cannot be done" - I found the perfect recipe HERE. A word of warning though - after making the batter and before changing it up a little it became apparent to me that either something was missing from the recipe  or the photo was in fact not a product of the recipe listed (original recipe has no cocoa yet photo clearly depicts a dark chocolate cake... trust me - the chocolate alone will never give you a cake that dark... also the pictured cake doesn't have the texture or colour variation/speckle that the addition of ground hazelnuts gives a cake)!?! 


But anyhow and here's what I did... I stuck mostly with the original recipes (reduced quantities) but with a few little tweaks here and there - let me know if you give this baby a go... I'd love to see some photos too!

"Heavenly Imbibed Hazelnut Hybrid"  :


THE FRANGELICO CAKE...
·         150g roasted hazelnuts (finely ground in food processor)
·         180g  Self Raising flour
·         3 Tbs Cocoa
·         3 large eggs
·         225g caster sugar
·         1 level teaspoons baking powder
·         150g salted butter, melted and cooled
·         60ml  milk
·         75ml  Frangelico
·         95g  dark chocolate, minimum 70% cocoa solids  (finely ground in food processor)
Preheat the oven to 180°C/350°F/Gas Mark 4.
Line the base of a 20cm spring form cake pan with baking paper, then grease and flour base and sides lightly
In separate bowl combine flour, hazelnuts and cocoa
Using an electric mixer, beat the eggs, sugar and baking powder for about 10 minutes until very thick and mousse-like. Next, using a large metal spoon, lightly fold in the butter, milk and half of the Frangelico, followed by the nut-flour mixture. Finally, fold in the chocolate.
Pour the mixture into the prepared cake tin and bake on the middle shelf of the oven for 45-50 minutes, or until well risen and golden, or when a fine skewer pushed into the centre of the cake comes out clean. Leave in the tin for 15 minutes before turning out onto a wire rack. Discard the paper.
Using a fine skewer, carefully pierce holes all over the top of the cake, then trickle with the rest of the Frangelico. 
***Now wrap the cake in plastic wrap and place into freezer whilst preparing cheesecake - this will make cutting the cake layers so much easier***

THE NUTELLA CHEESECAKE...
2 level tsp gelatine
1/4 cup boiling water
125g Marscapone Cheese
125g Cream Cheese (softened)
50g Icing Sugar
200g Nutella
1/4 cup Thickened Cream

Dissolve gelatine in boiling water and set aside to cool slightly whilst continuing.
In electric mixer, beat the cheeses and icing sugar till smooth.
Add Nutella and beat till combined then add cream and continue beating until mixture is blended and glossy.
Gradually beat in gelatin mixture and combine well.


THE CONSTRUCTION:

Remove Frangelico cake from freezer and using a suitably sharp knife cut the cake horizontally to create the two layers.
Place bottom layer of cake on serving plate and place the spring form pan without it's base around the cake. Spoon cheesecake mixture onto the base and smooth before gently placing top layer of cake on top.
Cover and place in refrigerator overnight to set.
The next day run a warm butter knife around the cake to help release and remove the spring form edges.... and yes admire your cake combination for a moment before proceeding...

TO MAKE GANACHE:
150g Nutella
150ml thickened cream
1/4 cup icing sugar
Over a low heat and stirring continuously melt nutella with cream. Once well combined allow to cool before using mixer to mix in icing sugar. Cover sides and top of cake with ganache and if desired decorate sides of cake with chocolate buttons or similar.

s
So there you have it... Enjoy... Share the love... leave me a comment - let me know what you think... Become a follower if you like (I know I like ☺) I love hearing from you all!

Oh and did I mention this cake is totally fat free?    HAH! This is definitely not for the faint hearted... my fat cells are throwing a party over this one!!!


Meanwhile I'll be partying over at:
Its a Hodgepodge Life
Fingerprints on the Fridge
Sassy Sites
The Crafty Nest
Mad in Crafts

Jul 23, 2011

DIY Super Simple Asymmetrical Top


Well, I know I've said it before... but I will say it again - I really have neglected my poor blog. I really am trying to organise home, family, home sewing and everything in between to get more balance and it feels like I'm getting there - which is the important thing - and I hope that this will mean I will get more blogging and sewing for my girls done.

I'm going to change a little about my home sewing and selling to minimise custom orders and move more towards selling ready made one of a kinds - the custom order sewing is really taking away from sewing for my two princesses and lately, sadly, it has been sapping some of the joy I normally feel from creating and sewing handmade items.

But anyhow, moving on....

A couple of days ago I was digging around the shed in a half hearted effort to sort some boxes that have remained unpacked for over a year now. This is one piece of clothing I found...


I made this top over 4 years ago as a maternity top when I was pregnant with Big Little Miss M. But I wore it today (as above) and really think it doesn't look too bad as a regular kind of top. Being no slim svelte waify model type I also really like that it's kind of a cover up for any lumps and bumps!!!

It is the most simple top to make and here's how you can turn 2 metres (or 2 yards) into a fabulous top (this in fact be enough fabric for TWO so you'll have a spare or one for a gift)... 

You can make this with so many different types of fabrics - jersey, sheers, cotton voiles, lace or like I have a knit - although it will hang better using light fabrics.


  • Take 2 metres (or 2 yards) of fabric.
  • Fold in half so your fabric is now 1 metre (or yard) doubled over with right sides together.
  • Cut in half lengthways (parallel) to the selvedges (this now gives you the fabric for the two tops)
  • Measure approx 50cm (19.5") along top edge (with fabric still doubled over R/S together) and sew a 10cm (4") seam to create the shoulder seam
  • Hem the neckline opening 
  • ....and if you're fabric doesn't fray or need hemming, that's it - YOU'RE DONE!!!
  • If it needs hemming just hem all the open edges or get creative and use bias trim (I've got the other half of mine with bias packed away somewhere...)
Throw your top on, add a belt or not and TAA DAA - you should definitely have time for a victory dance!

Belt or no belt - I think I prefer the belt... when I was pregnant I always wore this without one though

Such a quick and easy sewing project that I think I will have to whip up a couple more!


All my measures are approximates and can be changed up to make the top longer etc... with only a few modifications this could also be made into a dress (might have to give this a try when the weather warms up).

So, get creative - add some trims, bias, a brooch or buckle, a yo-yo or embellishment or two!

Hope it inspires you some as it really is such an easy, quick sewing project that I think is flattering on most figures (please tell me if I'm delusional and suffering some body dysmorphic issues - as I think it looks alright!)

If you have any questions about this tute or want a little more help or explanation with it please feel free to email or comment. (What makes sense to me, sometimes makes sense to no one else but me☺)

Cheers & hope to be back soon with some more tutes/refashions! ☺


Related Posts Plugin for WordPress, Blogger...